Local PC & LAN Installation
Installing RESUMate on a Windows machine is quick and easy. Just download and run the RESUMate 16 Installer file and follow the on-screen instructions, which is mostly just clicking the "Next" button.
Once RESUMate is installed, you'll also want to install the RESUMate Web Profile Tool for Google Chrome or Microsoft Edge. You can do so from Google's Chrome Web Store
Illustrated instructions for installing RESUMate as well as the Web Profile Tool can be found in this 2-page PDF:
If you are using RESUMate as a single user, that's all there is to it.
Sharing RESUMate on a LAN
If you will be using RESUMate with other people in the same location, you'll need to set up a "shared" folder to store the database and other files. The only requirement for the shared folder is that all other PCs using RESUMate on the network must have full permissions (read/write/create/destroy).
Peer-to-Peer Setup
For smaller networks (typically 5 users or less), you can have one person's PC act as the "server" and store the database file while that person is using RESUMate on the same machine. Please note that because this workstation is acting as a server, it must be on and available at all times.
- 1. Install RESUMate on the "server" PC following the instructions in our installation PDF
- 2. Share the "RESUMate" folder with full permissions. (See Basic Folder Sharing, below.)
- 3. Install RESUMate on the other workstation PCs.
- 4. After each installation is complete, click the Tools menu in RESUMate and select Options; then click on the "Data" tab.
- 5. On the "Data" tab, click the "Set RESUMate Folder" button and navigate to the shared "RESUMate" folder on the network.
- 6. Click the "Save" button.
Repeat steps 3-6 for each PC where RESUMate will be used. Once all instances of RESUMate are pointed to the same shared folder, installation is complete.
Dedicated File Server Setup
If you have a file server in your office, RESUMate data can be stored there even if RESUMate is not installed on that machine. The only requirement is a shared folder with full permissions. For larger networks (6 users or more) we recommend a dedicated file server instead of a peer-to-peer setup.
- 1. Download "RESUMate.zip" and extract it to your preferred location on your server.
Note to IT people: RESUMate.zip is an identical copy of the "RESUMate" folder that gets installed into the main Documents folder on a workstation. - 2. Share the "RESUMate" folder with full permissions. (See Basic Folder Sharing, below.)
- 3. Install RESUMate on the other workstation PCs.
- 4. After each installation is complete, click the Tools menu in RESUMate and select Options; then click on the "Data" tab.
- 5. On the "Data" tab, click the "Set RESUMate Folder" button and navigate to the shared "RESUMate" folder on the network.
- 6. Click the "Save" button.
Repeat steps 3-6 for each PC where RESUMate will be used. Once all instances of RESUMate are pointed to the same shared folder, installation is complete.
Basic Folder Sharing (Part 1)
Enable Folder Sharing on This Computer
In Windows 10 and 11, setting up a full permissions shared folder on a LAN is a two part process.
1. Click your Windows start/search button and enter "sharing". You will see an option for "Advanced Sharing Settings", select that
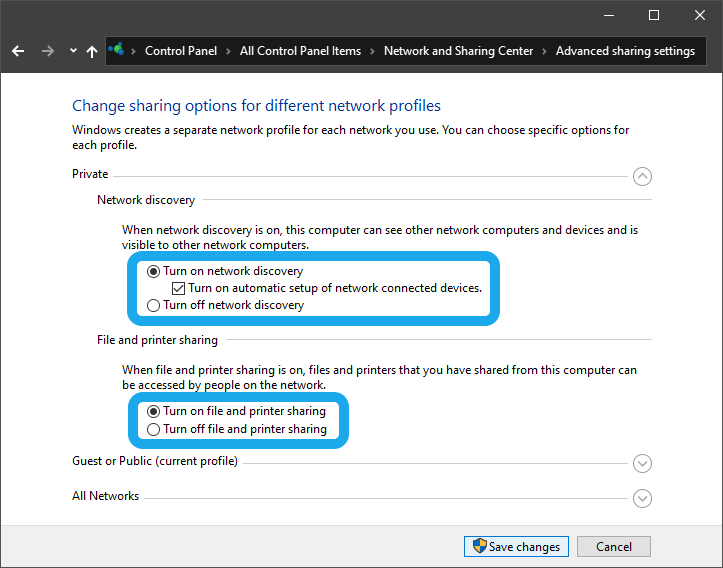
2. From the Advanced Sharing Settings screen, click to enable both "network discovery" and "file and printer sharing". Both should be turned on as shown in the screenshot below:
3. Still on the "Advanced Sharing Settings" screen, click to expand the "All Networks" menu and turn off password protect sharing as shown below:

You may now click "Save changes" and return to your Windows desktop.

Basic Folder Sharing (Part 2)
Share the RESUMate Folder
This will make the RESUMate database and other necessary files available to networked workstations.
1. Find the "RESUMate" folder, right click, and select "Properties"
2. On the Properties window, select the "Sharing" tab and click the "Advanced Sharing" button:

3. On the Advanced Sharing window, enable the "Share this folder" checkbox and then click the "Permissions" button.

4. On the Permissions window, check to allow "Full Control". All three checkboxes (Full Control, Change, and Read) should be checked.

5. Click the "OK" button to close the Permissions window.
6. Click the "OK" button to close the Advanced Sharing window.
7. Click the "OK" button to close the Properties window.
8. Restart the PC on which the folder was shared. Then restart the other workstation PCs. The "RESUMate" folder should now be visible and fully accessible from all other workstations on your network.